In the forefront of service mesh technology, we are excited to announce the availability of the Istio Ambient Preview on the AWS Marketplace, accessible as both an EKS Addon and Helm deployment. At Solo.io, our journey has been heavily influenced by the valuable insights and feedback from our customers concerning the development of the EKS Addon for the Istio open-source project. In response to this feedback, we proudly released the first version of the Istio EKS Addon, Istio 1.18.3, last year. This innovation allows for the seamless integration of Istio into your cluster, either as a part of your CI/CD pipeline or through the convenience of the AWS Web UI or AWS CLI. More detailed information is readily available here.
The Istio project has reached a pivotal new phase with the development of the Ambient extension. This advancement retains the original configuration methods for traffic management, security, and observability within the service mesh. However, it introduces a significant simplification by eliminating the need for proxy sidecars, alongside a notable reduction in resource consumption, thereby offering cost benefits.
The engineering team at Solo.io, in collaboration with the Istio community, has dedicated immense effort to deliver the finest implementation of Istio for AWS EKS and the Marketplace, ensuring Ambient functions flawlessly across various configurations. For an in-depth exploration of Ambient, consider watching this informative episode of “Containers from the Couch.” In it, Ram Vennam, a solution architect at Solo.io, explains the architectural improvements, offering viewers a deep dive into the advancements that Ambient brings to Istio.
With AWS EKS’s endorsement of our submission, the ambient mode is now ready for use as an EKS Addon. This development offers consumers a validated and straightforward method to deploy the latest version of Istio in ambient mode. Remarkably, no customization is needed; the binaries are validated by AWS and remain within its ecosystem, ensuring that there is nothing to download or configure on your end. Simply select the “ambient-preview” addon, and you’re set to deploy.
Overview of Deployment Options
Deploying the Istio Ambient Preview is tailored to be straightforward, accommodating a range of preferences with three primary deployment methods: AWS Web UI, AWS CLI, and Helm. Each method is designed to offer unique advantages, ensuring flexibility and ease of use across different operational needs and expertise levels.
- AWS Web UI: For those who prefer a graphical interface, this option provides a visual and intuitive way to manage deployments, enhancing ease of use.
- AWS CLI: Ideal for users who favor scriptable access, this method allows for automation and command-line efficiency in managing deployments.
- Helm: Suited for those who utilize package management capabilities in Kubernetes, offering customizable deployments through Helm charts.
In the following sections, we will delve into each deployment method in detail. You will find comprehensive steps, enhanced by relevant screenshots and command snippets, to guide you through the deployment process of the Istio Ambient Preview. Whether you are inclined towards a graphical interface, command-line utilities, or package management, each section is crafted to ensure you can leverage the innovative features of the Ambient Preview seamlessly and effectively, without the complexity.
Deploying with AWS Web UI
For those who prioritize simplicity and speed, deploying the Istio Ambient Preview through the AWS Web UI is the ideal route. This approach demands minimal preparatory work, making it especially accessible for users less acquainted with command-line interfaces or Helm configurations.
Upon successfully deploying your EKS Cluster, you can initiate the deployment of the Istio Ambient Preview without any preliminary setup. Here’s your starting point:
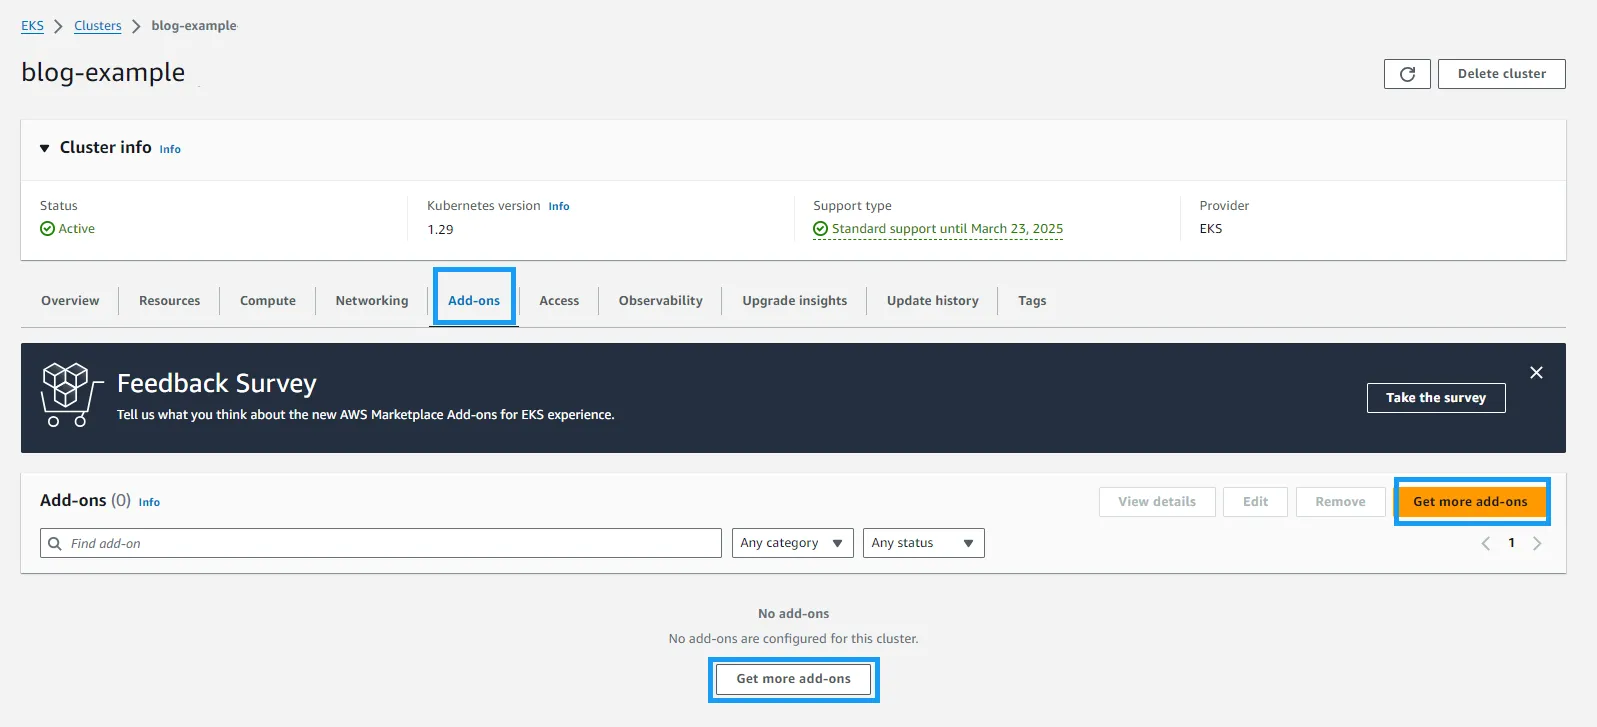
- Navigate to Your EKS Cluster: Log into the AWS Management Console and proceed to the EKS service. Within the EKS dashboard, select your cluster to view its details.
- Access Add-ons: Look for the “Add-ons” tab in your cluster’s detail page. Here, you will find the option to enhance your cluster with additional features and functionalities.
- Initiate Add-on Installation: Click on one of the “Get more add-ons” buttons.
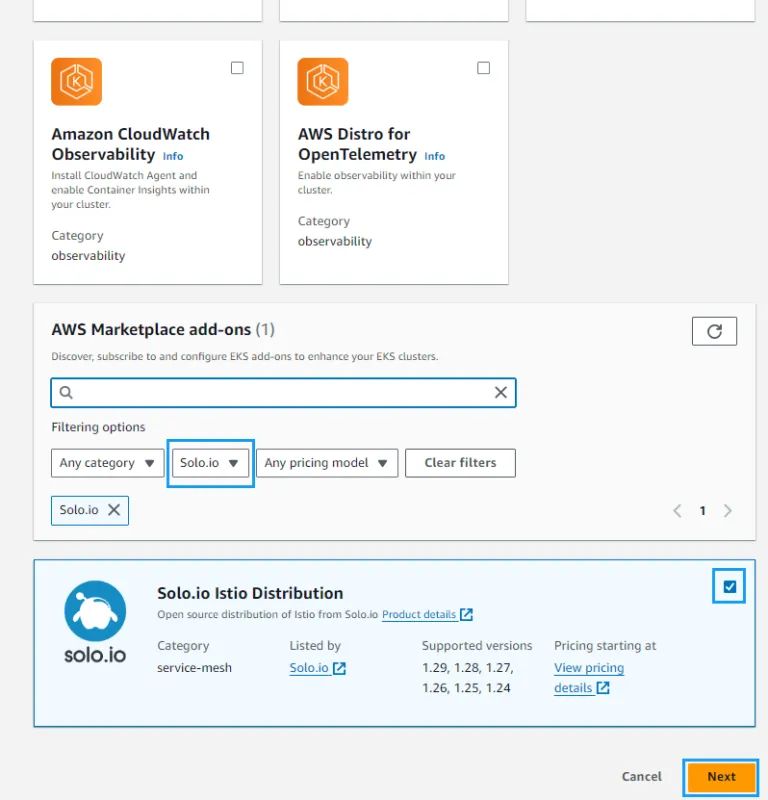
- You’ll be directed to a curated list of available add-ons specifically designed for EKS clusters. Within this selection, the Istio Ambient Preview awaits your discovery. Navigate past the AWS Native addons section until you find the vendor options. Here, select “Solo.io” to filter for their offerings. Locate the Solo.io Istio distribution from the list, select it, and then click the “Next” button to proceed:
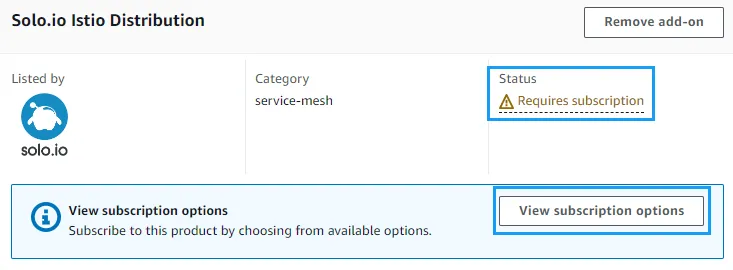
- If you are already a subscriber to the FREE Solo.io Istio Distro, you may proceed directly to the next step. If not, you will be redirected to the AWS Marketplace, where you’ll need to subscribe. Follow the subscription process to continue with the deployment:
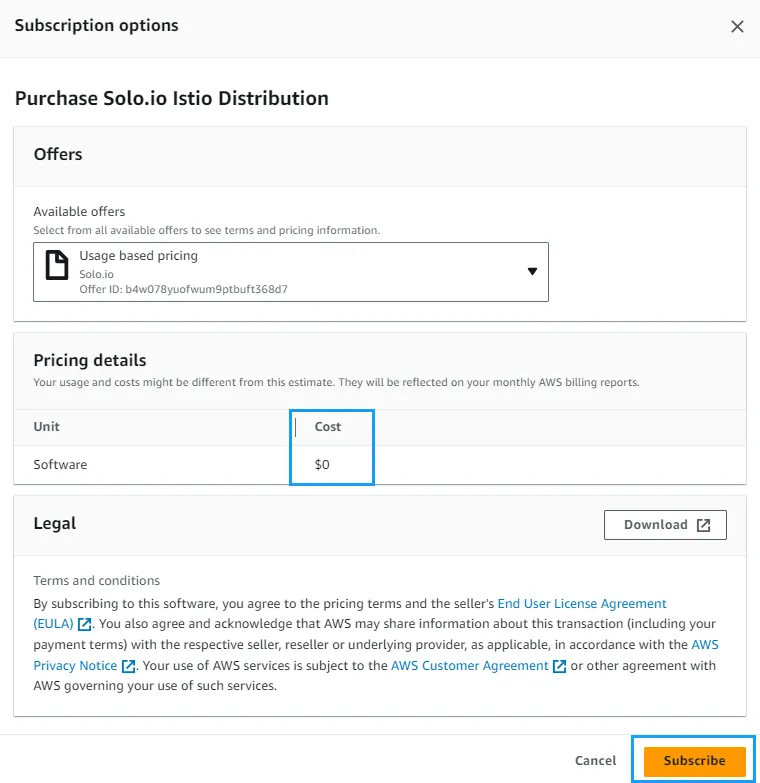
- On the next screen, confirm your subscription. This step is essential to proceed with the deployment of the Istio Ambient Preview. Carefully review the subscription details and click “Subscribe” to finalize your access:
- Please wait until the Status updates from “Subscription in progress” to “Ready to install”. This change indicates that your subscription process has completed, and you are now set to proceed with the installation:

- After completing the subscription, the following screen allows you to review your settings. Ensure everything is configured as desired, then continue by clicking the “Next” button:
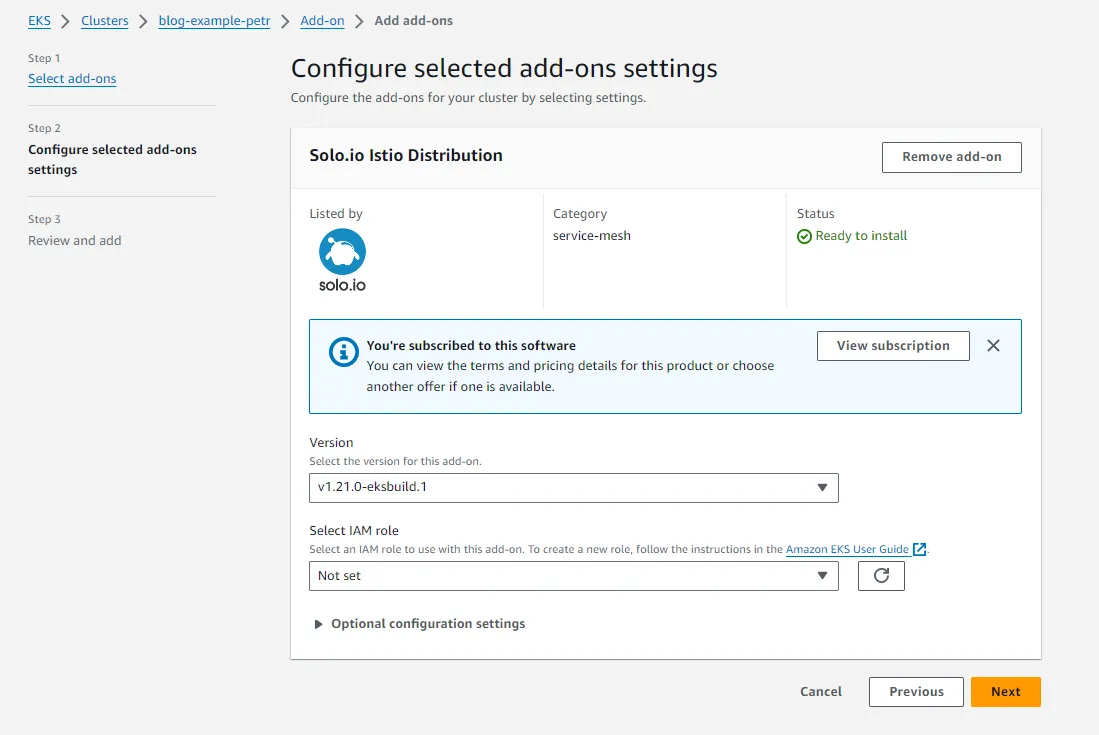
- On the screen that follows, finalize your setup by clicking the “Create” button:
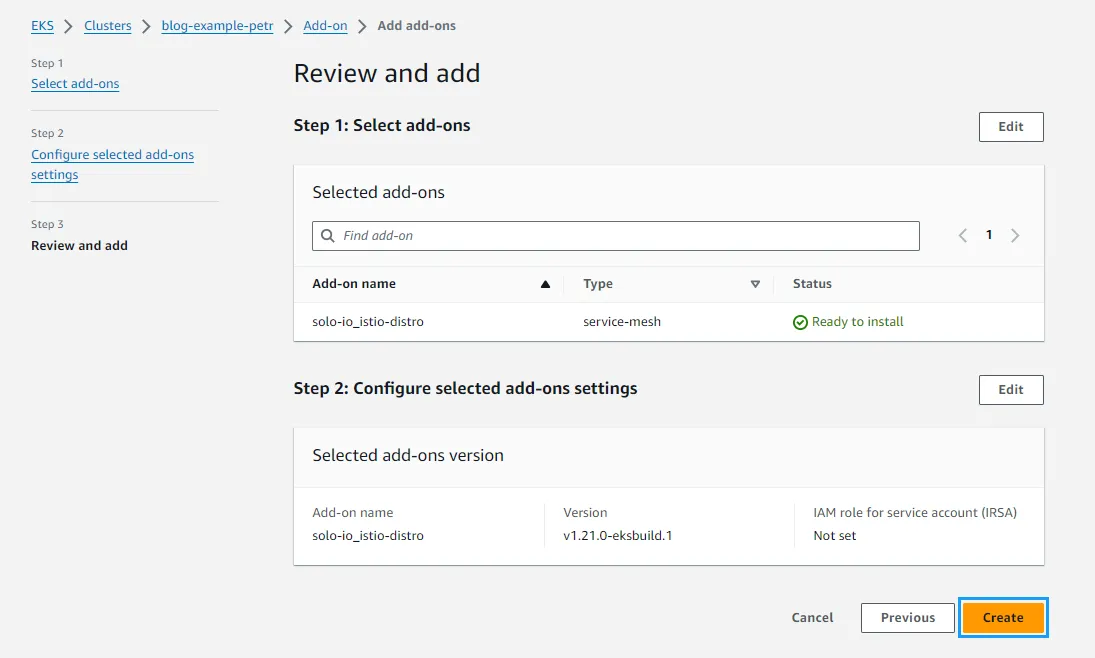
- You will then see a screen displaying the Addon status as “Creating”. This indicates that the installation process for the add-on has begun:
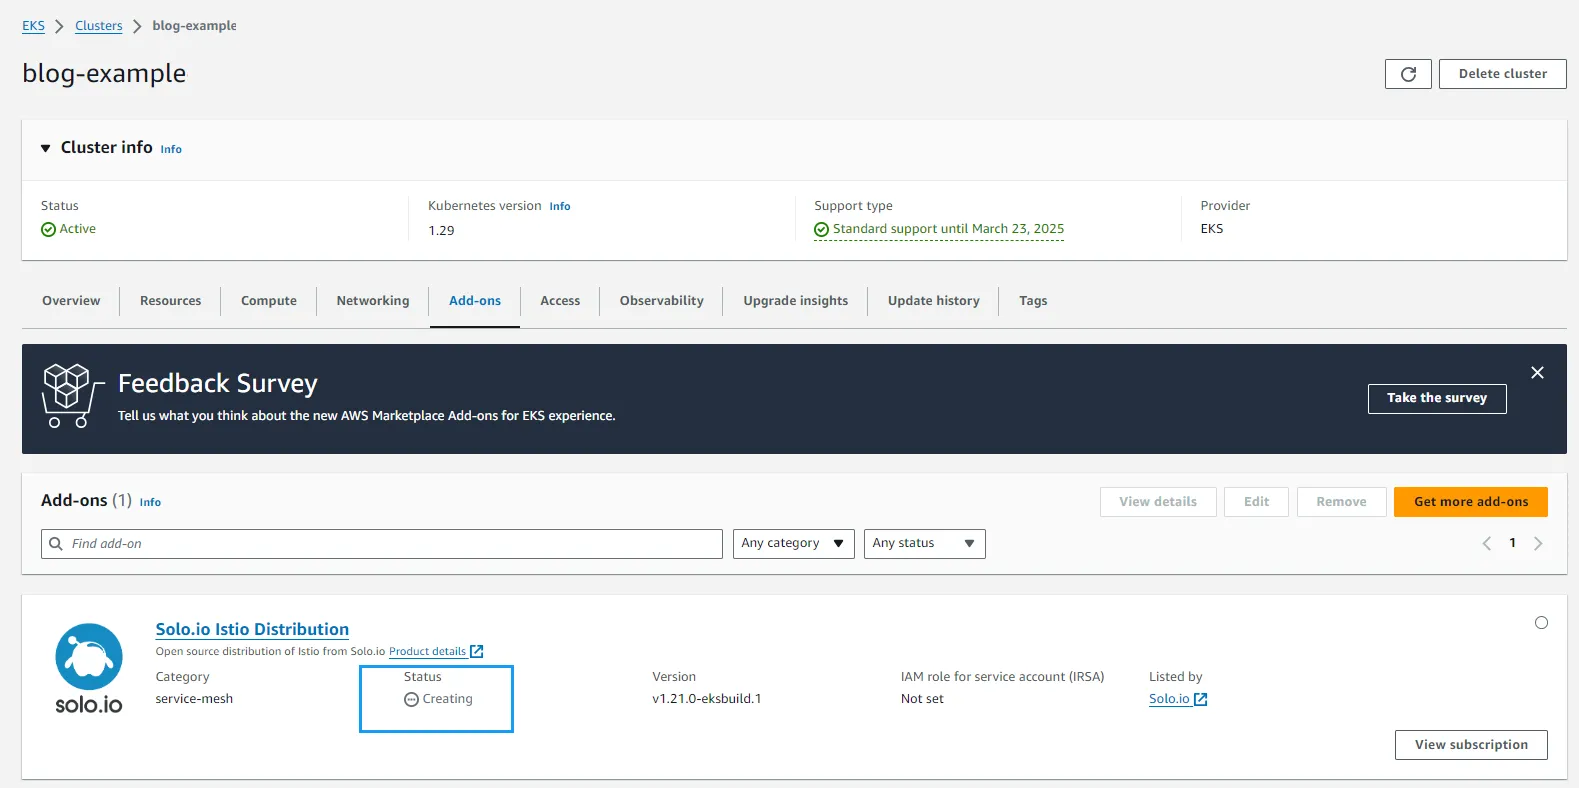
- After approximately 1-2 minutes, the Addon status will update to “ACTIVE,” indicating that the installation has successfully completed.

That’s all for the AWS Web UI portion! Your EKS cluster is now equipped with Istio running in Ambient mode, harnessing the latest in service mesh technology for enhanced performance and efficiency. As you move on to the CLI section, you’ll discover alternative methods to manage and leverage Istio’s capabilities within your environment.
Deploying with AWS CLI
For those who prefer the flexibility and automation capabilities of the command line, deploying Istio Ambient mode via the AWS CLI is just as straightforward as using the UI. This method is ideal for integrating addon deployment directly into your CI/CD pipeline. To begin, ensure you have the AWS CLI installed and configured with the correct AWS Region and EKS Cluster name.
- The deployment can be initiated with the following command:
- Immediately after executing the command, the expected output should resemble the following:

- To monitor the progress of your addon installation and ensure it’s successfully completed, use the following command. Repeat this command periodically until the output confirms the status as “ACTIVE” (this command queries the status of the Istio Ambient addon deployment, utilizing jq to parse and display the status clearly):
Congratulations! You’ve successfully deployed the Istio Ambient Preview on your EKS cluster using the AWS CLI. This command-line method provides a flexible and efficient way to integrate Istio into your existing workflows, especially for those incorporating CI/CD processes. With Istio now in Ambient mode, your cluster benefits from streamlined service mesh management, enhanced performance, and cost efficiency. Whether you’re automating deployments or integrating service mesh technology into large-scale systems, the AWS CLI method offers the control and scalability needed to advance your cloud-native initiatives.
Deploying Using Helm
For those who prefer leveraging Helm for package management in Kubernetes, deploying the Istio Ambient Preview is also supported through this versatile tool. Follow the steps below to deploy using Helm:
Prerequisites:
Ensure you are subscribed to the AWS Marketplace Solo.io Istio Distro to access the required Helm charts.
- Establish a Secure Session with AWS Marketplace: First, authenticate with AWS to establish a secure session for accessing the Helm charts:
You should see “Login Succeeded” confirming your successful authentication.
- Prepare Your Environment: Create a directory for the Helm chart and switch to it as your current working directory:
- Pull the Helm Chart: Retrieve the specific Helm chart for the Solo.io Istio distribution from AWS:
Upon pulling the chart, you’ll see confirmation including the chart version and digest.
- Extract the Helm Chart: Extract the contents of the Helm chart package:
- Deploy Istio Ambient Preview: Now, you’re ready to deploy the Istio Ambient Preview into your cluster:
Following the deployment, you’ll see output indicating the successful installation of “istiod” and other relevant details.
- Post-Deployment Verification: Confirm the Istio components are running in your cluster:
This command lists the pods within the istio-system namespace, showing their status as running.
By completing these steps, you have successfully deployed the Istio Ambient Preview using Helm, showcasing the flexibility of managing Kubernetes applications with Helm charts. This method provides a straightforward path to integrate Istio into your Kubernetes environment, leveraging Helm for efficient deployment and management.
Next Steps: Unlocking the Potential of Your EKS Cluster with Istio in Ambient Mode
With your EKS Cluster now seamlessly integrated with Istio in Ambient Mode, you stand on the brink of revolutionizing your service mesh capabilities. This setup not only enhances your cluster’s efficiency but also paves the way for deploying applications and configuring the service mesh to align perfectly with your business objectives.
To dive deeper and fully exploit the benefits of Istio in Ambient Mode, consider the following actions:
Explore and Subscribe: Visit the AWS Marketplace at Solo.io Istio Distribution to subscribe. Here, you’ll gain access to the resources needed to deploy your instance of Istio in Ambient Preview mode, ensuring your service mesh is equipped with the latest innovations.
Deploy and Innovate:
- Leverage the Advanced Features: Utilize the Istio Ambient Preview to deploy your applications, taking full advantage of a service mesh designed for efficiency, security, and adaptability to your unique requirements.
- Start with a Demo Example: To ease your transition to the production environment, begin with the Istio Bookinfo example deployment in Ambient mode. This hands-on example will guide you through the practical aspects of using Istio Ambient Preview, offering a solid foundation as you prepare for more complex deployments.
Share Your Experience: Your insights are invaluable. As you explore the capabilities of Istio in Ambient Mode, we encourage you to share your experiences with us. Your feedback is crucial for driving further improvements in the AWS EKS Istio Addon experience and contributing to the evolution of the Ambient project within the CNCF ecosystem.
By taking these steps, you not only enhance your own infrastructure but also contribute to a broader community effort to refine and advance cloud-native technologies. Let’s embark on this journey together, exploring the endless possibilities that Istio Ambient Preview offers and shaping the future of service mesh implementations.







%20a%20Bad%20Idea.png)



%20For%20More%20Dependable%20Humans.png)


