Technical

Getting Started: Integrating Gloo Gateway and Route53 for Dynamic DNS Updates

Exposing your Kubernetes Services to web traffic involves many moving parts, especially on AWS. You have to worry about all kinds of config to allow ingress to your applications, including Network Load Balancers (NLBs), their associated controllers on the EKS cluster, and, most importantly, dealing with DNS. 

Luckily, there’s a great community project called external-dns, which exposes Kubernetes Services and Ingresses with any public DNS provider, including Route53. Also supported is the Kubernetes Gateway API, an interface that Gloo Gateway will support starting in version 1.17, allowing us to dynamically create/update/delete Route53 DNS hostnames whenever we create an HttpRoute object. This takes care of keeping DNS records in sync with our application’s FQDN.

The following tutorial will walk us through the setup of external-dns with Route53.  It will also demonstrate how easy it is to integrate Gloo Gateway with external-dns, giving us an easy mechanism to synchronize DNS hostnames with our delegated HttpRoutes, without having to maintain them in two separate places.


Prerequisites

  • An AWS account
  • AWS CLI
  • Gloo Gateway v1.17 installed on an EKS cluster. The quickest path is to follow these instructions.


Method

We need to create IAM Policy, k8s Service Account, and IAM Role and associate them together for the external-dns pod to add or remove entries in AWS Route53 Hosted Zones.

Set up external-dns and Route53

  1. Create IAM Policy. This IAM policy will allow the external-dns pod to add, remove, and update DNS entries (Record Sets in a Hosted Zone) in AWS Route53 service.

a. Via the AWS Web UI, go to Services -> IAM -> Policies -> Create Policy.

b. Click on JSON tab and copy/paste the below JSON snippet.

c. Click on Visual Editor tab to validate.

d. Click on Review Policy.

e. Name: AllowExternalDNSUpdates.

f. Description: Allow access to Route53 Resources for ExternalDNS.

g. Click on Create Policy.

{
   "Version": "2012-10-17",
   "Statement": [
     {
       "Effect": "Allow",
       "Action": [
         "route53:ChangeResourceRecordSets"
       ],
       "Resource": [
         "arn:aws:route53:::hostedzone/*"
       ]
     },
     {
       "Effect": "Allow",
       "Action": [
         "route53:ListHostedZones",
         "route53:ListResourceRecordSets",
         "route53:ListTagsForResource"
       ],
       "Resource": [
         "*"
       ]
     }
   ]
 }

h. Make a note of the Policy ARN which we will use in next step e.g.

arn:aws:iam::986112284769:policy/AllowExternalDNSUpdates

2. Create IAM Role, k8s Service Account, and Associate IAM Policy.  As part of this step, we are going to create a k8s Service Account named external-dns and also a AWS IAM role and associate them by annotating the role ARN in the Service Account. In addition, we are also going to associate the AWS IAM Policy AllowExternalDNSUpdates to the newly created AWS IAM Role.

a. Create IAM Role, k8s Service Account, and Associate IAM Policy. Don’t forget to replace the placeholders.

# Template
eksctl create iamserviceaccount \
    --name service_account_name \
    --namespace service_account_namespace \
    --cluster cluster_name \
    --region region_name \
    --attach-policy-arn IAM_policy_ARN \
    --approve

# Replace name, namespace, region, cluster and arn 
eksctl create iamserviceaccount \
    --name external-dns \
    --namespace default \
    --cluster eksdemo1 \
    --region us-east-2 \
    --attach-policy-arn arn:aws:iam::180789647333:policy/AllowExternalDNSUpdates \
    --approve

b. Verify the external-dns service account, but primarily verify the annotation related to the IAM Role.

kubectl get sa external-dns

3. Verify CloudFormation (CFN) Stack

a. Go to Services -> CloudFormation.

b. Verify the latest CFN Stack created.

c, Click on Resources tab.

d. Click on link in Physical ID field, which will take us to IAM Role directly.

4. Verify IAM Role & IAM Policy

a. With the above step in CloudFormation, we will land in an IAM Role created for external-dns.

b. Verify in Permissions tab we have a policy named AllowExternalDNSUpdates.

c. Now make a note of that Role ARN, as this we need to update the External-DNS k8s manifest with.

arn:aws:iam::180789647333:role/eksctl-eksdemo1-addon-iamserviceaccount-defa-Role1-1O3H7ZLUED5H4

5. Update External DNS Kubernetes manifest

a. Update the following template placeholder domain-filter [line-69] with your Route53 DNS name eg. solo-wlm.net

apiVersion: v1
kind: ServiceAccount
metadata:
 name: external-dns
 labels:
   app.kubernetes.io/name: external-dns
---
apiVersion: rbac.authorization.k8s.io/v1
kind: ClusterRole
metadata:
 name: external-dns
 labels:
   app.kubernetes.io/name: external-dns
rules:
 - apiGroups: [""]
   resources: ["services","endpoints","pods","nodes"]
   verbs: ["get","watch","list"]
 - apiGroups: ["extensions","networking.k8s.io"]
   resources: ["ingresses"]
   verbs: ["get","watch","list"]
 - apiGroups: [""]
   resources: ["namespaces"]
   verbs: ["get","watch","list"]
 - apiGroups: ["gateway.networking.k8s.io"]
   resources: ["gateways","httproutes","grpcroutes","tlsroutes","tcproutes","udproutes"]
   verbs: ["get","watch","list"]
---
apiVersion: rbac.authorization.k8s.io/v1
kind: ClusterRoleBinding
metadata:
 name: external-dns-viewer
 labels:
   app.kubernetes.io/name: external-dns
roleRef:
 apiGroup: rbac.authorization.k8s.io
 kind: ClusterRole
 name: external-dns
subjects:
 - kind: ServiceAccount
   name: external-dns
   namespace: default # change to desired namespace: externaldns, kube-addons
---
apiVersion: apps/v1
kind: Deployment
metadata:
 name: external-dns
 labels:
   app.kubernetes.io/name: external-dns
spec:
 strategy:
   type: Recreate
 selector:
   matchLabels:
     app.kubernetes.io/name: external-dns
 template:
   metadata:
     labels:
       app.kubernetes.io/name: external-dns
   spec:
     serviceAccountName: external-dns
     containers:
       - name: external-dns
         image: registry.k8s.io/external-dns/external-dns:v0.14.2
         args:
           - --source=service
	    - —-provider=aws
           - --source=ingress
           - --source=gateway-httproute
           - --domain-filter=solo-wlm.net # will make ExternalDNS see only the hosted zones matching provided domain, omit to process all available hosted zones
           - --provider=aws
           - --aws-zone-type=public # only look at public hosted zones (valid values are public, private or no value for both)
           - --txt-owner-id=external-dns
           - --log-level=debug
         env:
           - name: AWS_DEFAULT_REGION
             value: us-east-2 # change to region where EKS is installed

b. Apply the above template (externaldns-with-rbac.yaml) by running:


kubectl apply -f externaldns-with-rbac.yaml

c. Check the pods logs and ensuring that external-dns started correctly:


kubectl logs external-dns-5fc769fcf7-qtmcl -c external-dns

d. If the container has started correctly, you should see the following

time="2024-05-29T19:57:47Z" level=info msg="All records are already up to date"


Install Gloo Gateway on EKS 

  1. Install the AWS load balancer controller on your EKS machine using these instructions.
  2. Using your newly installed EKS cluster, install Gloo Gateway using this Getting Started guide up to step 6.
  3. For step 7 of the Getting Started guide onwards, there are specific load balancer annotations required for EKS NLB’s to be assigned correctly. We’ll put them into the gateway parameters CR then apply the Gateway resource referring back to the GatewayParameters. You can use the following command: 
 kubectl apply -n gloo-system -f gateway.yaml
apiVersion: gateway.gloo.solo.io/v1alpha1
kind: GatewayParameters
metadata:
 name: gwparams
 namespace: gloo-system
spec:
 kube:
   service:
     type: LoadBalancer
     extraAnnotations:
       service.beta.kubernetes.io/aws-load-balancer-nlb-target-type: instance
       service.beta.kubernetes.io/aws-load-balancer-scheme: internet-facing
       service.beta.kubernetes.io/aws-load-balancer-type: external
---
kind: Gateway
apiVersion: gateway.networking.k8s.io/v1
metadata:
 name: http
 annotations:
   gateway.gloo.solo.io/gateway-parameters-name: "gwparams"
spec:
 gatewayClassName: gloo-gateway
 listeners:
 - protocol: HTTP
   port: 8080
   name: http
   allowedRoutes:
     namespaces:
       from: All

4. Deploy the sample httpbin app:

kubectl create ns httpbin

kubectl -n httpbin apply -f https://raw.githubusercontent.com/solo-io/gloo-mesh-use-cases/main/policy-demo/httpbin.yaml

5. Expose the httpbin app using Gloo Gateway. Update the hostnames field to reflect your Route53 domain name. 

kubectl apply -f httpbin-route.yaml -n httpbin
apiVersion: gateway.networking.k8s.io/v1beta1
kind: HTTPRoute
metadata:
 name: httpbin-orion
 namespace: httpbin
 labels:
   example: httpbin-route
spec:
 parentRefs:
   - name: http
     namespace: gloo-system
 hostnames:
   - "calypso.solo-wlm.net"
 rules:
   - backendRefs:
       - name: httpbin
         port: 8000

 6. If the update is successful, you should be able to call your endpoint (with curL) using your dynamically created DNS name:

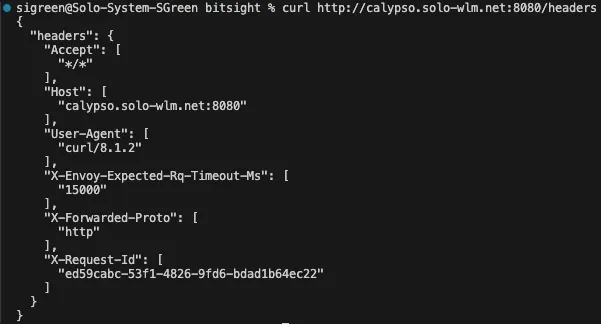
7. Also check the external-dns logs to ensure the updates were successful:

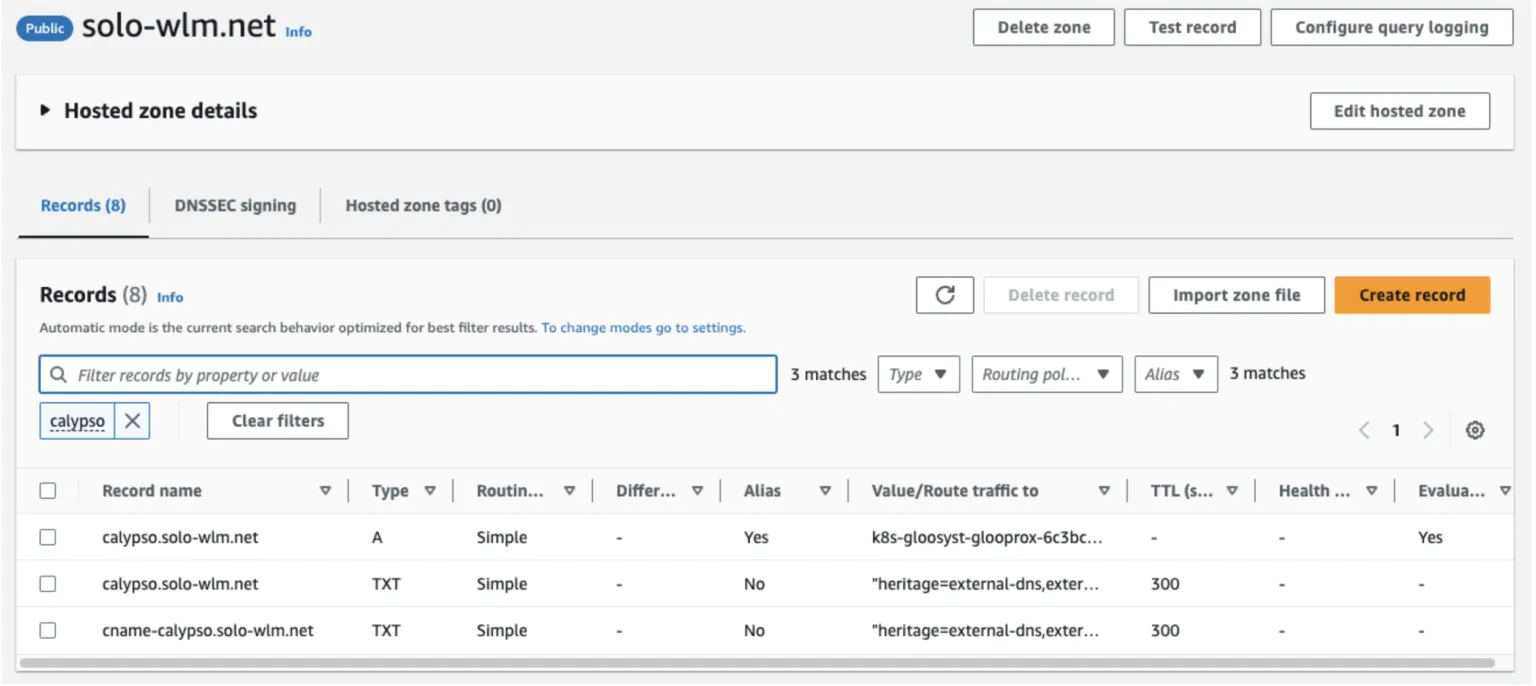
8. Via the AWS Web Console, you can see the DNS records created in Route53:

9. ** BONUS TASK ** Try deleting your newly created httpbin route (kubectl delete -f httbin-route.yaml -n httpbin) to see what happens in the Route53 console. Is the behavior what you expected?


Explore More Ways to Get Started

This tutorial demonstrates the ease of integrating an external DNS provider like Route 53 with Gloo Gateway, without the headache of worrying about keeping DNS records in sync with one another. For other examples of using external-dns with Gloo Gateway and extending this to integrate with a CertManager, take a look at the External DNS & Cert Manager Getting Started Guide.