In Part 1 of this blog, we pulled a Houdini vanishing act with our Kubernetes cluster. We showed how to use Solo’s cloud-native Gloo Gateway to deploy and manage our Envoy-based API gateway into a VM-only, no-Kube environment. And we did all of that without sacrificing the declarative elegance and standards compliance of the Kubernetes Gateway API. Nice bit of magic, eh?
In Part 2, we’ll take the control plane that we magically transported to a VM in the first part, and with a little hocus-pocus we’ll make it reappear in Kubernetes. We’ll lay all this out in a step-by-step approach that you can reproduce in your own environment.
But before that, let’s review the deployment models supported by Gloo Gateway that we introduced in Part 1.
Gloo Gateway Deployment Models
In this blog, we’re going to take a look at three deployment models for Gloo Gateway.
- Conventional Model: All Kube, All the Time
- VM-Only Model: No Kube, Any of the Time
- Hybrid Model: Some Kube, All the Time
We discussed the conventional model and the VM-only model in Part 1 of this blog. Here we’ll focus on the hybrid model, including a step-by-step example where you can follow along.
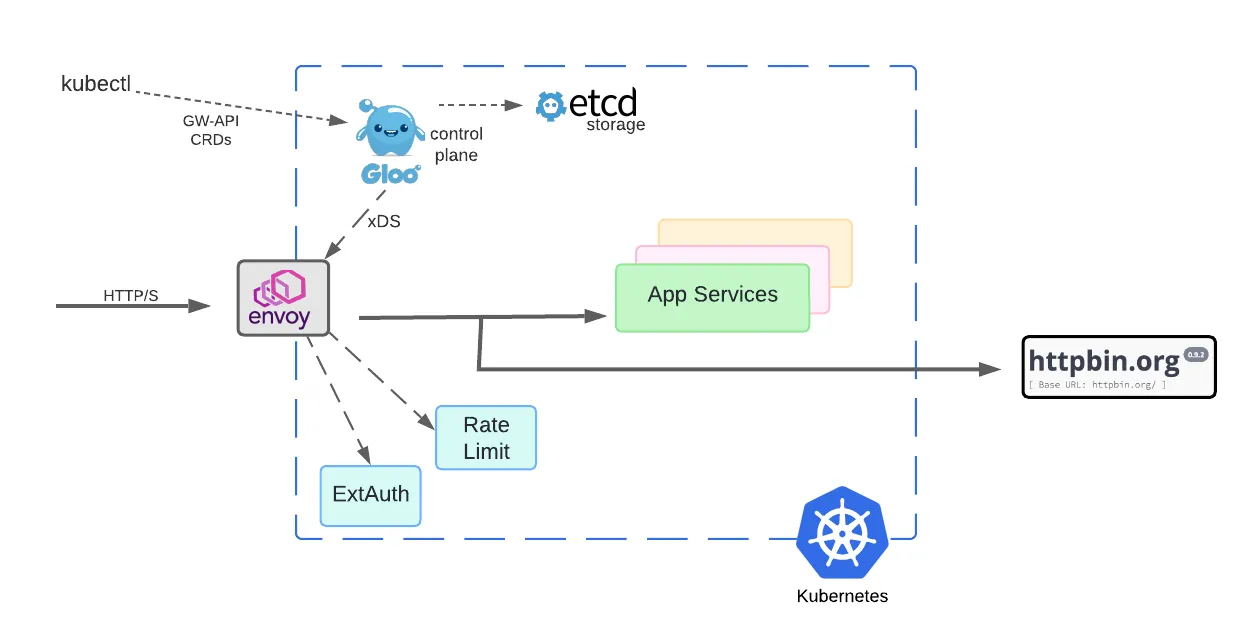
Conventional Model: All Kube, All the Time
To recap where we’ve been, this diagram depicts the conventional model that Gloo Gateway users have employed. Note that both data plane and control plane components are deployed in Kubernetes clusters.
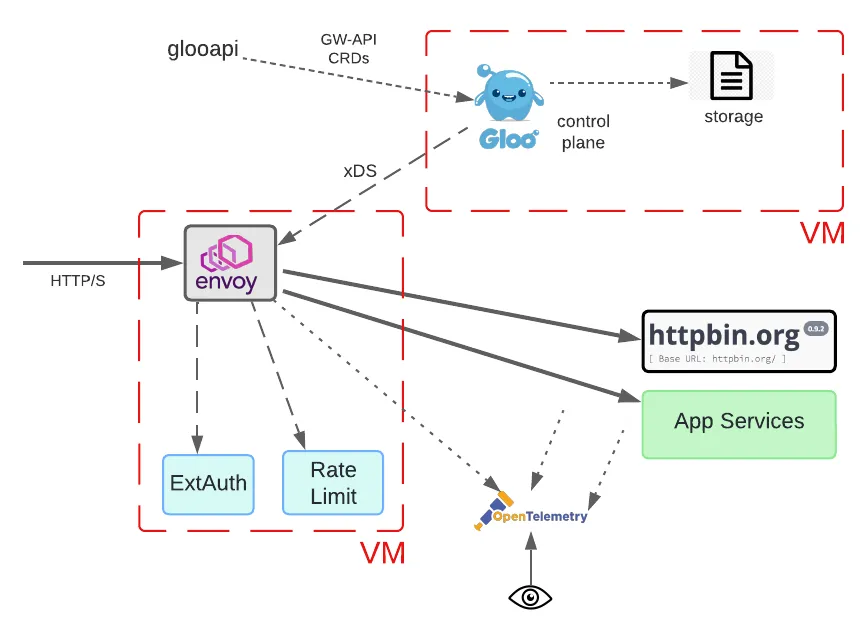
VM-Only Model: No Kube, Any of the Time
In Part 1 of this blog, we spent a lot of time considering a pretty drastic departure from Gloo’s original models. We placed not only the Envoy proxy and related data path components in a non-Kubernetes VM, but also the control plane. Both single-VM deployments and multi-VM deployments, as depicted below, are supported by Solo.
Hybrid Model: Some Kube, All the Time
Now let’s envision an organization that sees Kubernetes and cloud-native architectures as a strategic direction but maintains a substantial portfolio of legacy systems. Many of these reside in on-prem data centers and most haven’t been modernized.
Now let’s imagine that this organization needs to either add a new gateway capability or replace an obsolete gateway. Employing a managed gateway control plane using their own declarative policies might be attractive, but requiring a Kubernetes cluster to host the data plane components “near” their existing legacy services is likely a bridge too far.
For this organization, employing an architecture as shown in the following diagram makes sense.
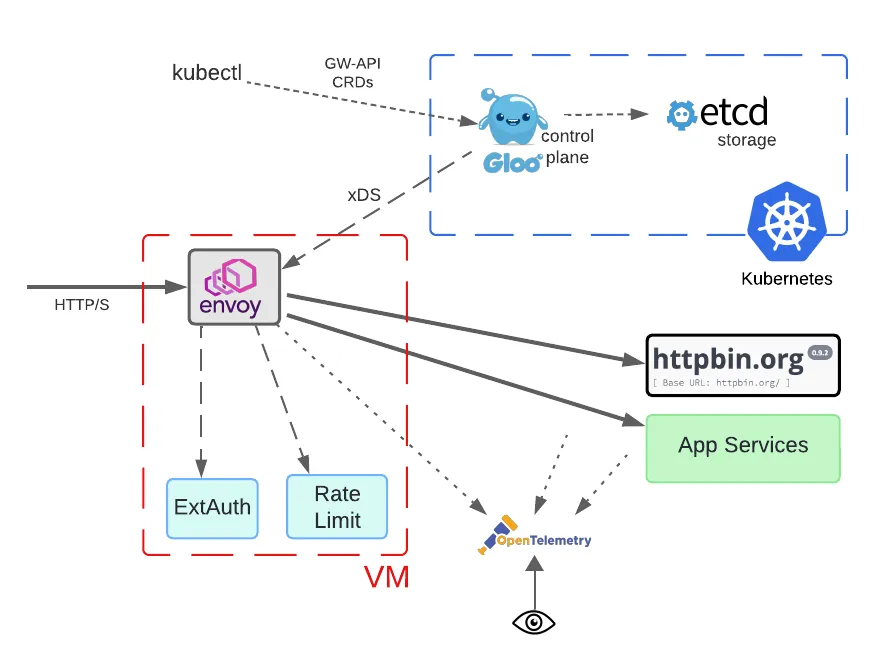
Note that all the data path components are deployed in a VM with no Kubernetes requirement. This means that operationally, the Envoy proxy, ExtAuth, and rate limiting processes can’t be managed using Kubernetes facilities. However, they are presumably already doing this for their legacy systems, so it should fit well into existing operations.
Note that the use of a VM instead of Kubernetes to host Envoy proxies is not an either-or proposition. Many Gloo Gateway users program multiple gateways from the same control plane. In this situation, some of the gateway proxies could be hosted on a VM as depicted in the diagram. Others could be hosted in Kubernetes.
The biggest difference in this scenario is the interface between the Envoy proxy and the Gloo control plane. Although the former lives in a VM and the latter lives in a Kubernetes cluster, they are still connected via the xDS protocol that Envoy uses to consume its configuration snapshots. Since the Gloo control plane still lives in Kubernetes, the same storage frameworks and tools used to specify the configuration do not change at all.
Innovative Solo customers have occasionally used this hybrid deployment style in the past. But going forward, it will be a first-class citizen in the Gloo Gateway world.
Step-by-Step with Hybrid Deployments
How exactly do these models work? We’ll explore how to bring the hybrid model to life with a real-world example. We’ll demonstrate that hybrid deployments require no sleight-of-hand, even when using the Kube GW-API to program a non-Kube Envoy deployment.
In addition to showing basic installation of these new packages for the data plane VM, we’ll establish that the same declarative APIs are used to configure Gloo’s most popular gateway features:
- Traffic routing;
- External authorization;
- Rate limiting; and
- TLS termination.
Prerequisites
We’ll carry out this example scenario using a vanilla EC2 VM and an EKS cluster. Note that AWS infrastructure is not required to use this capability. Any properly resourced VM based on a Debian or RHEL distribution should be fine for the proxy deployment. Similarly, any well-behaved Kubernetes distro should be fine for hosting the Gloo control plane.
Data Plane VM Prerequisites
We’re using a stock AWS Ubuntu image at version 24.04 LTS. It’s deployed on a single t2.medium EC2 instance in the us-east-2 region, running with 2 vCPUs, 4GB RAM, and 8 GB of disk.
Beware of trying to run this on EC2 with an instance size smaller than t2.medium. We encountered resource issues trying to use a micro instance.
If running with multiple VMs, you’ll need to ensure that the network configuration on your VMs is sufficiently open to allow traffic to flow between the control and data planes. Since we’re building this strictly for test purposes, we shared a single AWS security group across our two EC2s. Our SG allowed all traffic to flow both inbound and outbound across our VMs. You would of course never use such an unsecured configuration in a production environment.
Licensing Prerequisites
Note that VM deployment support is an enterprise feature of Gloo Gateway. To work through this example and install the Gloo control plane, you’ll require a license key as well as the Debian or RPM packages that support VM installation for the data plane. Navigate to this link to begin the process of setting up a free trial.
Control Plane Kubernetes Prerequisites
Assuming you plan to carry out this exercise on AWS, we first assume that you have access to an EKS cluster, or sufficient AWS permissions to create a cluster.
If you’re creating a cluster, you can use the AWS console or the eksctl CLI. We used the eksctl CLI utility as a simpler alternative to the console. Try this command with the eksctl CLI to create a modest demo cluster with two m5.large instances for this scenario:
This command creates a cluster named solo-ggvm in the Ohio (us-east-2) region. If you don’t specify a region, eksctl defaults to the Oregon (us-west-2) region. A full AWS region list with corresponding codes is available here.
It will also be handy to have tools available for managing and monitoring your EKS cluster. Standard kubectl and helm are useful for managing the control plane, as well as the aws CLI.
Networking Prerequisites
You’ll need to ensure that the network configuration on your VMs and EKS cluster is sufficiently open to allow traffic to flow between the control and data planes. Since we’re building this strictly for test purposes, we used a permissive AWS network configuration to facilitate this. In particular, you need to traffic to be able to flow from the data plane components — Envoy proxy, ExtAuth process, Rate Limiter process — to the Gloo control plane xDS port (9977, by default) that we’ll later expose from our EKS cluster.
Gateway API Prerequisites
The Kubernetes Gateway API abstractions are expressed using Kubernetes custom resource definitions (CRDs). These CRDs are not installed by default, ensuring that they are only available when users explicitly activate them.
Let’s install those CRDs on our cluster now.
Expect to see this response:
Install Control Plane on Kubernetes
Let’s install the Gloo control plane by configuring an instance of enterprise Gloo Gateway on our EKS cluster. We’ll use helm to complete the installation, so we’ll first need to add its repo for enterprise Gloo Gateway.
Then we’ll run the helm installer:
Note in particular the last two customizations in this helm installation. Both the extensions for extAuth and rateLimit are disabled. What this means is that the default mechanisms for external authorization and rate limiting are not deployed along with the control plane in the Kubernetes cluster. Instead, when we configure the data plane on a VM, we will co-locate those with the Envoy proxy. That makes the most sense in this scenario since these two components are both delegates of the Envoy proxy, living in the data path of the request. Both of these components, along with the Envoy proxy, will receive their configuration from the Gloo control plane deployed in Kubernetes.
In less than a minute from issuing the helm install command above, you should see a response similar to this:
You can confirm that the Gloo control plane has successfully been deployed by using this kubectl command:
Now we’ll create a Gateway object to define a listener that will be opened on the Envoy proxy to be configured on the data plane VM.
In this case, we declare an HTTP listener to be opened on the proxy at port 8080. We’ll apply that on our control plane VM using the kubectl utility.
You can confirm that the Gateway has been accepted by the control plane. Note the Accepted entries in the status stanza:
Make Gloo Control Plane Visible to Envoy
The Envoy proxy and other data plane components must be able to reach the Gloo control plane in order to accept the declared configurations. With a default installation of Gloo Gateway, the control plane is not visible outside the Kubernetes cluster where it is deployed. That would be a fatal problem in our scenario, where we intend to deploy the data plane on a vanilla EC2 VM.
In particular, we need to ensure that port 9977 on the control plane is reachable from the data plane components, Envoy and the processes for extAuth and rate limiting in our case. Port 9977 is where the Envoy xDS protocol is served from the Gloo control plane.

We’ll keep it simple to expose the Gloo xDS port visible externally. Let’s use kubectl to change gloo from the default ClusterIP service type to be LoadBalancer instead.
Let’s confirm that this change had the desired impact. First, we’ll inspect the service itself:
Second, since we’re performing this change in EKS, applying this service type change causes AWS to create a load balancer on our cluster that we’ll use externally. Find the external DNS name of this endpoint using kubectl:
Now let’s switch to our data plane VM and use the netcat utility to confirm that the Gloo xDS port is indeed visible to us.
To recap, on the control plane we have installed Gloo Gateway, we have configured a Gateway that will ultimately establish a listener on our Envoy proxy, and we have exposed our control plane service so that the data plane components can be properly programmed by the declarative Gateway API.
Data Plane Package Structure
Let’s turn our attention to configuring the data plane. We’ll first consider the package structure for installing in a No-Kube data plane environment. These Gloo Gateway packages are available in popular Linux formats, like Debian and RPM, and also as a single-stack AWS AMI.
The packaging comes in multiple flavors, to facilitate mix-and-match of architectural components across multiple VMs:
gloo-gateway– Envoy proxy data planegloo-extensions– Optional data plane services- data plane component that enforces external authorization policies, like API keys, Open Policy Agent, and OpenID Connect
- rate limiter component
gloo-control– Envoy control plane services- Gloo control plane
glooapiCLI, deliverskubectl-like services in VM environments
In this example, we’ll only use the gloo-gateway and gloo-extensions packages, since they are required for installing the data plane components on a VM. The control plane is being managed using conventional Gloo services in Kubernetes, so the gloo-control package is not required in our scenario. See Part 1 of this blog for a step-by-step example that does demonstrate use of gloo-control.
Install Data Plane Packages
Copy either the gloo-gateway.deb or gloo-gateway.rpm package to the data plane VM depending on the distro being used.
Install it using the distro’s package manager.
For Debian-based distros:
For RPM-based distros:
Configure the package by editing /etc/gloo/gloo-gateway.env and applying two updates:
- Change
GATEWAY_NAMEto a name corresponding to theGatewayresource created previously (http-gateway). - Change
CONTROLLER_HOSTto point to the FQDN of the AWS load balancer that we exposed earlier, which fronts the Gloo control plane.
The completed gloo-gateway.env file on the data plane VM should look something like this:
Enable and start the Gloo API and controller services:
Confirm the services are running:
Set the GATEWAY_HOST environment variable to the address of the gateway VM. If you’re executing your curl invocations from the same VM where the gateway is deployed, you can simple use localhost as the value here.
Confirm Access to Upstream Service
Before we proceed with the gateway configuration, let’s first confirm that we have access from the data plane VM to the upstream httpbin service:
If network connectivity is in order, you should see something similar to this with an HTTP 200 response code:
Traffic Routing
On the control plane VM, create an Upstream component that points to the httpbin.org service. Then configure an HTTPRoute object that routes traffic to this service:
Use the kubectl utility to apply these two objects to the Gloo control plane. It will then translate these objects into Envoy configuration and update the proxy configuration on the Envoy proxy automatically via the xDS protocol.
You can confirm traffic the gateway has accepted this new configuration by sending a request from the data plane VM to the local gateway on port 8080:
As you can see above, the response returned from httpbin indicates that our traffic routing works as expected.
If the request doesn’t succeed, first confirm the status of the HTTPRoute is in the Accepted state on the control plane. If you don’t see a response that includes a status stanza similar to the one below, then try debugging by deleting and re-applying all the configuration steps above.
Another debugging tip is to check the status of the gloo-gateway using systemctl, then restart and recheck the status if there’s a problem.
Enable Extensions in Gloo Settings
You might recall that we disabled the extAuth and rateLimit extensions to Gloo Gateway when we installed its control plane in an earlier step. The purpose of that was to disable deployment of the pods that enable these capabilities in Kubernetes. In this exercise, we’re instead co-locating these components with Envoy proxy on the data plane VM.
But in order to activate these extensions in our environment, we need to enable these components in the Gloo Settings component. We’ll use kubectl to edit:
Add these stanzas to the spec of the settings:
These *ServerRefs point to Gloo Upstream objects that tell the Envoy proxy how to locate these extensions at runtime. Let’s go ahead and instantiate those Upstreams now:
External Authorization
In this section we’ll configure the Gloo external auth components on our VM, then declare and test an HTTP basic auth strategy on the gateway.
Install Gloo Gateway ExtAuth Components
The ExtAuth service is provided by the gloo-extensions package. Copy either the gloo-extensions.deb or gloo-extensions.rpm package to the gateway VM depending on the distro being used.
Install it using the distro’s package manager.
For Debian-based distros:
For RPM-based distros:
Configure the package by editing /etc/gloo/gloo-extauth.env and applying an update to GLOO_ADDRESS to point to the host:port address of the Gloo control plane that we exposed earlier. Be sure to include both the FQDN of the load balancer and the port number 9977, from which the xDS protocol is served.
Enable and start the Gloo API and controller services:
Confirm the service is running:
Configure HTTP Basic Auth
Refer to the product documentation to learn about how Gloo Gateway enables HTTP basic auth using declarative configuration — and many other authorization strategies, too! — at the gateway layer.
In this exercise, we use the username test and password test123. The username and password have been hashed using the Apache htpasswd utility to produce the following:
- salt:
n28wuo5p - hashed password:
NLFTUNkXaht0g/2GJjUM51
On the cluster hosting the control plane, we’ll create a corresponding AuthConfig resource. See the Gloo Gateway docs for a full list of supported request authorization strategies.
Use kubectl to apply this object to the control plane:
We’ll then add a new configuration object, the RouteOption, to point at our HTTP basic auth config. We’ll use a targetRefs stanza to automatically attach this behavior to all routes in our existing HTTPRoute.
Apply this new configuration on the control plane VM using kubectl:
On the data plane VM, confirm that a request without an Authorization header fails as expected:
Confirm a request with the base64 encoded user:password set in the Authorization header succeeds:
See the Gloo Gateway docs for more information on how to create declarative, API-driven authorization, along with a complete list of supported protocols.
Rate Limiting
In this section we’ll configure the Gloo rate limiting components on our VM, then declare and test a global one-request-per-minute strategy on the gateway.
Install Gloo Gateway Rate Limiting Components
The Gloo Gateway rate limiting service is included in the gloo-extensions package. It can be installed on either the gateway or control VM, but since the gloo-extensions package is already installed on the gateway VM, we will use it there. As a general rule, you want the rate limiting service to be installed “near” the Envoy proxy gateway, which delegates to the rate-limit service as required to evaluate whether to accept a given request.
This example uses a simple one-per-minute global rate limiting config. You can be much more discriminating in your rate limiting than this, including rate limiting for particular users or classes of service, or even sets of request attributes. Learn more about the flexibility of Gloo rate limiting in the product documentation.
Rate limiting requires a persistence mechanism to track the counters of the various scenarios that are being rate-limited. Redis is the default choice for this storage, although other options are supported by Gloo as well.
In our case, we’ll deploy a simple free Redis instance. You can of course use a more robust enterprise Redis service, too.
Install the Redis service on the gateway VM. In our example, we follow this guide for a basic installation on our Ubuntu EC2 instance.
We will use redis123 as the password to access the keys on the server. Add the following to the bottom of the /etc/redis/redis.conf file:
Apply this config to the Redis config and restart the service:
Configure the package by editing /etc/gloo/gloo-ratelimiter.env and applying two updates:
- Set
REDIS_PASSWORD=redis123. - Change
GLOO_ADDRESSto point to the host:port address of the Gloo control plane that we exposed earlier. Be sure to include both the FQDN of the load balancer as well as the port 9977, from which the xDS protocol is served.
The completed gloo-ratelimiter.env file on the data plane VM should look something like this:
Note in particular that the REDIS_PASSWORD field matches our new global password.
Enable and start the gloo-ratelimiter service on the data plane VM:
Configure Rate Limiting
Apply a global rate limit config to limit requests to one per minute:
Apply this new rate limit specification on the control plane VM using kubectl:
Now we’ll add this to our gateway’s configuration by creating a new RouteOption object that points at our RateLimitConfig, and we’ll again use the targetRefs stanza to attach this rate limiting behavior to all the routes on our existing HTTPRoute.
Apply the new rate limiting RouteOption using kubectl:
Confirm requests are being rate limited by issuing the same request to the gateway twice in succession. The first should be processed with no problem. The second should be rejected at the gateway layer with an HTTP 429 Too Many Requests error.
TLS Termination
Create certificates on your workstation that will be used to secure communication between the Envoy proxy and its clients, and then install them as a Secret on your Kubernetes cluster:
Modify the Gateway component to add an HTTPS listener on the proxy listening on port 8443.
Apply this new Gateway config on the Gloo control plane:
Back on the data plane VM, confirm that the HTTPS request succeeds:
Since the rate limiting configuration is still in place, you should also be able to re-issue the same request within a minute and see the expect HTTP 429 Too Many Requests error:
Cleanup Gloo Gateway Resources
Gateway / Data Plane VM
On Debian-based distros:
On RHEL-based distros:
Control Plane Cluster
If you created the cluster using eksctl as described in the Prerequisites section and would like to delete the cluster now:
If you want to maintain your cluster but remove all Gloo Gateway and Gateway API artifacts, then download and use the glooctl CLI on your workstation:
Once glooctl is installed, then you can easily remove Gloo Gateway from your cluster:
Recap and Next Steps
If you’ve followed along to this point, congratulations! We’ve deployed the entire Gloo Gateway infrastructure in a hybrid environment, with the data plane on an EC2 VM and the control plane in an EKS cluster. We’ve established TLS termination for all services in our gateway layer. Plus, we’ve configured basic traffic routing and some advanced features like external authorization and rate limiting. And we did this all with a Kubernetes-standard, declarative API.
Gloo Gateway equips its users with a unified control plane and delivers many operational benefits across both Kubernetes and non-Kube platforms:
- Simplified Management: Benefit from a single interface for managing both API gateway and service mesh components, reducing the burden of overseeing multiple systems.
- Consistent Policies: Enforce consistent security, traffic management, observability, and compliance policies across Kube and non-Kube infrastructure, ensuring uniform adherence to best practices.
- Streamlined Operations: Isolate and resolve operational issues quickly by leveraging the centralized monitoring, logging, and troubleshooting capabilities provided by the unified control plane.
- Enhanced Observability: Enjoy heightened visibility into traffic patterns, performance metrics, and error rates across different types of infrastructure.
To experience the Gloo Gateway magic across multiple platforms for yourself, request a live demo here or a trial of the enterprise product here.
If you’d like to explore the more conventional Kube-only deployment approach with the Gateway API, check out this tutorial blog.
Explore all the configuration used in this exercise is available in GitHub here.
If you have questions or would like to stay closer to Solo’s streams of innovation, subscribe to our YouTube channel or join our Slack community.
Acknowledgements
One of the great things about working with Solo is that there are lot of people smarter than I am to provide advice and reviews. Many thanks to Shashank Ram for doing much of the core engineering work and supporting me throughout this process. And also thank you to Ram Vennam and Christian Posta for their insights that greatly enhanced this blog.


%20a%20Bad%20Idea.png)


%20For%20More%20Dependable%20Humans.png)