
We at Solo are big believers in Envoy proxy. It has been a fundamental element of our products since we shipped our first open-source products back in 2018. Envoy is widely recognized as the next-generation foundation of proxy technology. It is open-source, cloud-native and highly scalable. This superb video documents its motivations and emergence over the past few years.
We’re also big believers in the new Kubernetes Gateway API. Its 2023 GA release is an important standards milestone for the Kubernetes community. It represents an evolution in capabilities from the earlier Kubernetes Ingress API. This is evidenced by the many vendors and open-source communities within the API gateway and service mesh ecosystems moving aggressively to adopt it.
Not surprisingly then, Solo and its Gloo Gateway product have been among the first movers in adopting both Envoy and the Kube Gateway API.
You might also reasonably conclude that Kubernetes is a requirement for adopting Gloo technology. After all, most of the products in the Envoy community target Kubernetes deployments exclusively.
But what if I told you that Gloo Gateway could make that Kubernetes requirement disappear?
But why? If container orchestration via Kubernetes represents the future, then why does this flexibility matter? The answer is simple: Legacy Systems.
It’s easy to criticize Legacy Systems. You didn’t build them. You don’t want to maintain them. But you can’t just retire them.
Why? Because they’re delivering real value for your organization. Some of them likely pre-date Kubernetes, back when clouds were just puffy cotton balls in the sky.
And when you need to deploy an API gateway to safely expose them to the outside world, adding a Kubernetes dependency is just too complex. Your legacy gateway may be a bloated, overpriced, monolithic beast. But Kubernetes is a bridge too far in those scenarios. Even when container orchestration is a strategic direction for the enterprise.
What if you could enjoy the best of both worlds? A modern API gateway with a cloud-native architecture that delivers the flexibility of Kube, hybrid, and even No-Kube VM deployments.
That’s the promise of the latest versions of Gloo Gateway.
Gloo Gateway Deployment Models
In this blog, we’re going to take a look at three deployment models for Gloo Gateway.
- Conventional Model: All Kube, All the Time
- Hybrid Model: Some Kube, All the Time
- VM-Only Model: No Kube, Any of the Time
We’ll discuss the conventional model here, to set the cloud-native foundation that underlies all Solo technology. We’ll briefly touch on the hybrid model, but give it a more complete treatment in Part 2 of this blog. Finally, we’ll dig into the VM-only model in this post, including a step-by-step example where you can follow along.
Conventional Model: All Kube, All the Time
This diagram depicts the conventional model that Gloo Gateway users have employed.
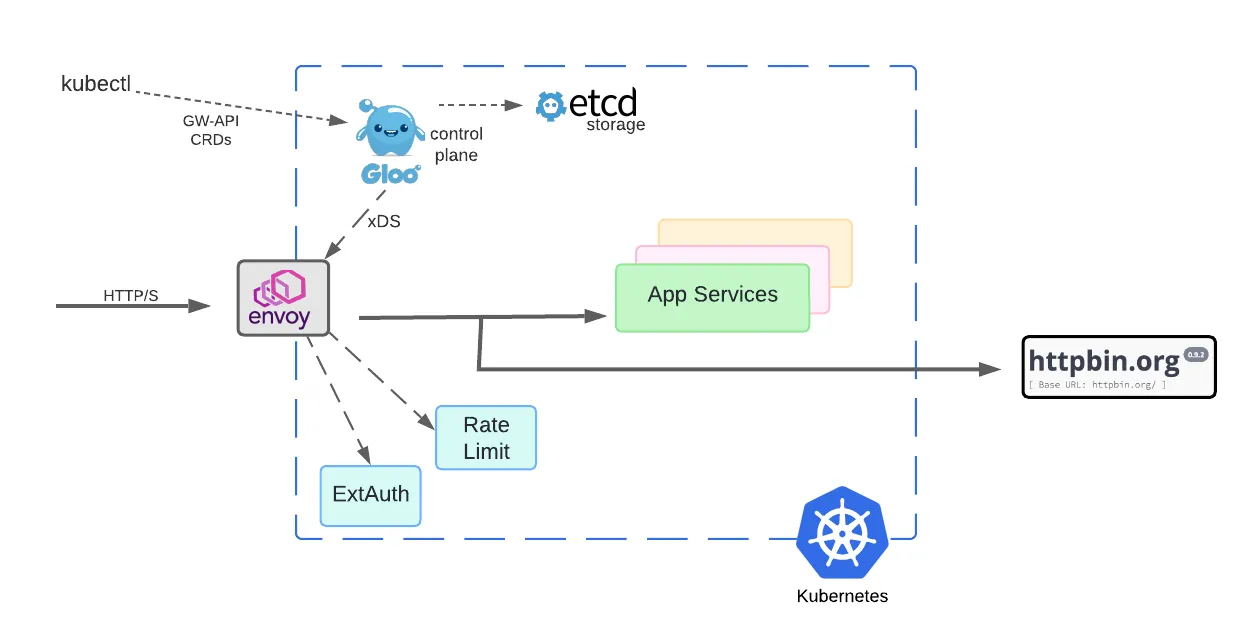
Gloo configurations are specified using Kubernetes Gateway API CRDs. This is important for several reasons. First, the Gateway API is being quickly adopted across modern gateways, yielding significant reusability benefits for core capabilities. Second, because these APIs are expressed as CRDs, they support declarative configuration with modern GitOps platforms like ArgoCD and Flux. Additionally, you can use standard Kubernetes CLI tools like kubectl.
Deploying the Gloo control plane in Kubernetes has other benefits as well, notably the ability to use the native etcd storage system and other Kubernetes facilities. That’s why, unlike many alternatives in the marketplace, Gloo technology doesn’t require you to spin up separate database services just to support artifact storage. Fewer moving parts translate into simpler architectures and a better user experience.

Envoy is the heart of the request data path. In this model, the Envoy proxy is deployed as a LoadBalancer service. It accepts requests from outside the cluster and processes each of them to comply with policies specified by the Gloo control plane. The control plane can be viewed as a giant translation engine. It accepts simple GW-API CRDs as input and produces complex Envoy configurations as output. The Envoy proxy fleet consumes this configuration via a protocol called xDS, but this process is independent of its high-volume request processing.
This design allows Envoy to remain lightweight and process requests remarkably fast. It can be scaled independently from the control plane. This delivers vast improvements in cost and scalability over prior generations of gateways that are deployable only in large monolithic chunks.
Modern API gateways do much more than basic TLS termination and traffic routing. They often deliver advanced capabilities like external authorization and rate limiting. These critical and resource-intensive features impact the data path of managed requests. For example, ExtAuth often requires sophisticated policy evaluation steps and even delegation to external identity provider platforms. The Envoy proxy decrypts outside requests, evaluates the relevant policy configurations, and then delegates to the ExtAuth and rate limiter as required before routing traffic to upstream application services.
Historically, Gloo users needed to scale all these components separately. The processing load due to core Envoy request processing can vary significantly from the requirements of ExtAuth and rate limiting. So in the conventional model, these services are deployed as separately scalable sets of Kubernetes pods, as shown in the diagram above.
Hybrid Model: Some Kube, All the Time
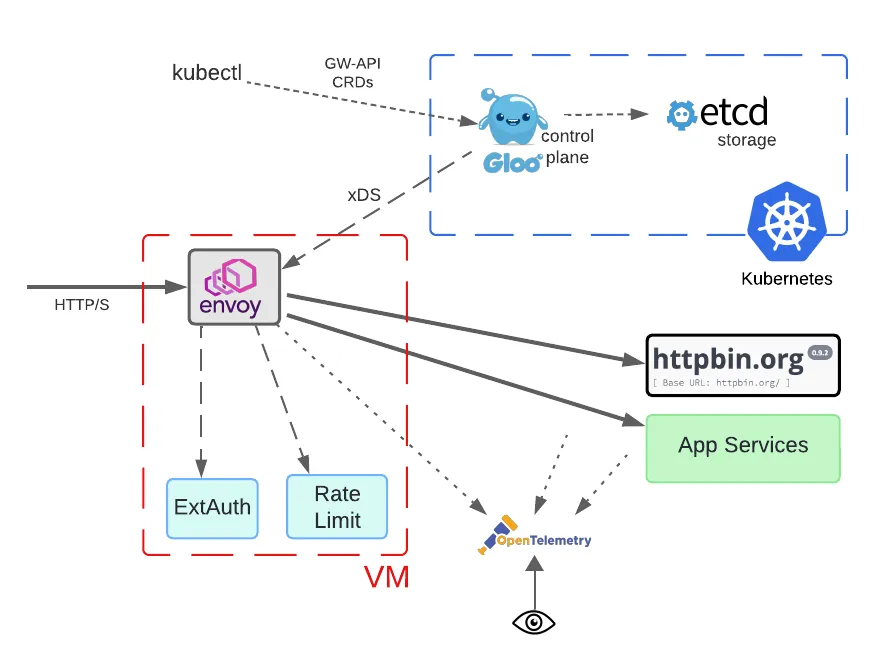
Solo now supports a hybrid deployment model, where Envoy proxies and data path components like ExtAuth and rate limiting are hosted in a VM. But the Gloo control plane is hosted in a Kubernetes cluster. We’ll preview just the architectural diagram for now, and save the complete discussion for Part 2 of this blog.
VM-Only Model: No Kube, Any of the Time
Finally, let’s consider an even more drastic departure from Gloo’s original deployment models. In this case, we’ll place not only the Envoy proxy and related data path components in a non-Kubernetes VM but also the control plane.
Note that while multiple VMs are depicted below, single-VM deployments are fully supported by Solo, too.
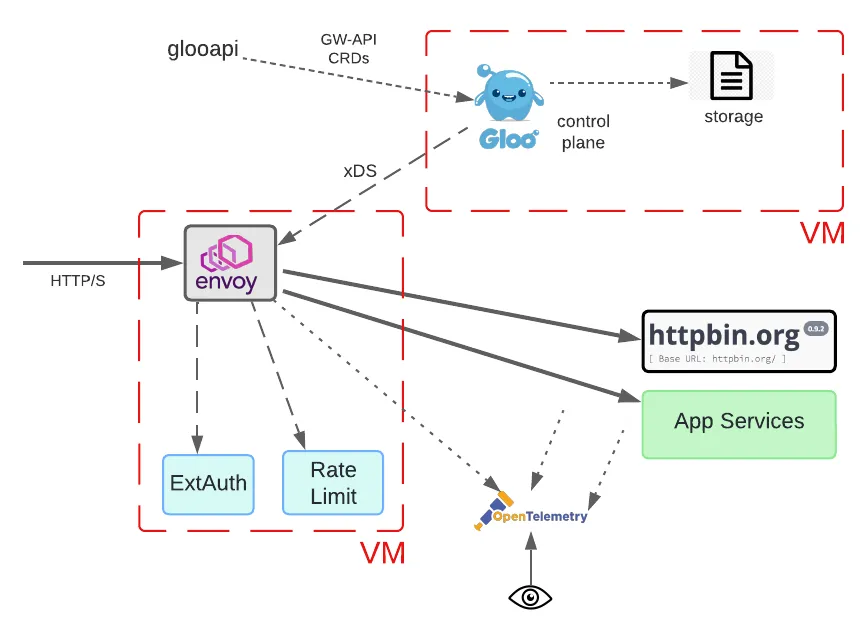
This model introduces significant changes. Neither the data plane nor control plane components can be provisioned using Kubernetes facilities. Since the Gloo service itself will be VM-deployed, this has implications for both the storage layer and tooling. When the control plane was Kubernetes-deployed, it could use the native etcd service for storing its CRD configuration.
This is no longer possible, so Gloo Gateway supports a couple of storage alternatives. The simplest, default option is to enable file-based storage for the Gloo component. This is fine for development and basic deployments. However, if high availability (HA) is a user requirement, something more robust is needed. Gloo supports independent shared storage mechanisms like Postgres for such cases.
Common developer tooling like kubectl is impacted as well. It is commonly used to manage and inspect CRDs like those published as part of the Kubernetes Gateway API. You can see its usage in a conventional GW-API scenario in tutorials like this. But we require an alternative since there is no Kube cluster on the receiving end of this tooling. Solo has responded with a pluggable alternative called glooapi. This tool offers the same interface for reading and writing GW-API components as before, but it interacts directly with the Gloo control plane, which in turn manages object storage and translation into Envoy configurations.
Interestingly, the use of the GW-API is not affected by any of these changes. Even without a Kubernetes cluster, the Gloo control plane still understands these CRDs and can translate them into Envoy proxy configuration.
The magic of employing a declarative API like GW-API in both Kube and No-Kube contexts is the secret elixir in Gloo Gateway.
An Observability Note
As we develop these models that cross between Kube and VM environments, we need to pause and consider observability. This kind of complexity breeds major operational challenges when trying to manage deployments and debug issues.
Standards like OpenTelemetry are the keystone of an enterprise observability strategy. Gloo Gateway data path components support OTel across any deployment environment. That goes a long way toward forestalling operational issues. For further automated OTel support across your application networks, consider service mesh technologies like Istio and its commercial counterpart Gloo Mesh.
Step-by-Step with No-Kube Deployments
How exactly do these models work? We’ll explore how to bring one of these models to life with a real-world example. We’ll demonstrate that No-Kube deployments require no sleight-of-hand, even when using the Kube GW-API.
In addition to showing basic installation of these new packages, we’ll establish that the same declarative APIs are used to configure Gloo’s most popular gateway features:
- Traffic routing;
- External authorization;
- Rate limiting; and
- TLS termination.
Prerequisites
We’ll carry out this example scenario using two vanilla VMs, one for the control plane and another for the data plane. You can spin these up in your environment using either a Debian-based Linux distro or a RHEL-based distro.
We’re using AWS for the test process outlined in this document, although a properly resourced workstation running these VMs with a modern hypervisor should be fine, too. We’re using a stock AWS Ubuntu image at version 24.04 LTS. It’s deployed on two t2.medium EC2 instances in the us-east-2 region, running with 2 vCPUs, 4GB RAM, and 8 GB of disk.
Beware of trying to run this on EC2 with an instance size smaller than t2.medium. We encountered resource issues trying to use a micro instance.
If running with multiple VMs, you’ll need to ensure that the network configuration on your VMs is sufficiently open to allow traffic to flow between the control and data planes. Since we’re building this strictly for test purposes, we shared a single AWS security group across our two EC2s. Our SG allowed all traffic to flow both inbound and outbound across our VMs. You would of course never use such an unsecured configuration in a production environment.
Note that this VM support is an enterprise feature of Gloo Gateway. To work through this example, you’ll require a license key as well as the Debian or RPM packages that support VM installation. Navigate to this link to start a free trial.
Package Structure
Before we start exploring gateway features, we first consider the package structure for installing in a No-Kube environment. This incarnation of Gloo Gateway is available in popular Linux formats, like Debian and RPM, and also as a single-stack AWS AMI.
The packaging comes in multiple flavors, to facilitate mix-and-match of architectural components across multiple VMs:
gloo-control– Envoy control plane services- Gloo control plane
glooapiCLI, deliverskubectl-like services in VM environments
gloo-gateway– Envoy proxy data planegloo-extensions– Optional data plane services- data plane component that enforces external authorization policies, like API keys, Open Policy Agent, and OpenID Connect
- rate limiter component
Install Control Plane Packages
Copy either the gloo-control.deb or gloo-control.rpm package to the control-plane VM. Install it using your distro’s package manager.
For Debian-based distros:
For RPM-based distros:
Edit /etc/gloo/gloo-controller.env and specify the license key you obtained from Solo as the value for GLOO_LICENSE_KEY.
Enable and start the Gloo API and controller services:
Confirm the services are running:
Confirm the glooapi service responds to queries:
The GatewayClass that you should see from the previous command is a component of the Gateway API standard that Gloo creates to declare what types of Gateway objects the user can create.
Now we’ll create a Gateway object to define a listener that will be opened on the Envoy proxy to be configured on the data plane VM.
In this case, we declare an HTTP listener to be opened on the proxy at port 8080. We’ll apply that on our control plane VM using the glooapi utility. In a Kubernetes cluster, you would use kubectl to apply this Gateway object to the Gloo control plane. But since no such cluster is being used, we’ll use the drop-in replacement glooapi CLI instead.
You can also use glooapi to confirm that the Gateway has been accepted by the control plane. Note the Accepted entries in the status stanza:
Install Data Plane Packages
Copy either the gloo-gateway.deb or gloo-gateway.rpm package to the data plane VM depending on the distro being used.
Install it using the distro’s package manager.
For Debian-based distros:
For RPM-based distros:
Add an entry to the /etc/hosts file to resolve the Gloo controller’s hostname to its IP address. This IP address should match the VM where your control plane is deployed. The DNS entry may appear as follows:
The hostname gloo.gloo-system.svc.cluster.local is the default location of the gloo control plane deployment when Gloo Gateway is deployed on Kubernetes. Specifying this DNS entry makes it easier to complete this configuration with no problems.
Edit /etc/gloo/gloo-gateway.env and update the GATEWAY_NAME to a name corresponding to the Gateway resource created previously (http-gateway). The completed gloo-gateway.env file on the data plane VM might look something like this:
Enable and start the Gloo API and controller services:
Confirm the services are running:
Set the GATEWAY_HOST environment variable to the address of the gateway VM. If you’re executing your curl invocations from the same VM where the gateway is deployed, you can simple use localhost as the value here.
Confirm Access to Upstream Service
Before we proceed with the gateway configuration, let’s first confirm that we have access from the data plane VM to the upstream httpbin service:
If network connectivity is in order, you should see something similar to this with an HTTP 200 response code:
Traffic Routing
On the control plane VM, create an Upstream component that points to the httpbin.org service. Then configure an HTTPRoute object that routes traffic to this service:
Use the glooapi utility to apply these two objects to the Gloo control plane. It will then translate these objects into Envoy configuration and update the proxy configuration automatically via the xDS protocol.
You can confirm traffic the gateway has accepted this new configuration by sending a request to the gateway on port 8080:
As you can see above, the response returned from httpbin indicates that our traffic routing works as expected.
If the request doesn’t succeed, first confirm the status of the HTTPRoute is in the Accepted state on the control plane. If you don’t see a response that includes a status stanza similar to the one below, then try debugging by deleting and re-applying all the configuration steps above.
Another debugging tip is to check the status of the gloo-gateway using systemctl, then restart and recheck the status if there’s a problem.
External Authorization
In this section we’ll configure the Gloo external auth components on our gateway VM, then declare and test an HTTP basic auth strategy on the gateway.
Install Gloo Gateway ExtAuth Components
The ExtAuth service is provided by the gloo-extensions package. Copy either the gloo-extensions.deb or gloo-extensions.rpm package to the gateway VM depending on the distro being used.
Install it using the distro’s package manager.
For Debian-based distros:
For RPM-based distros:
Enable and start the Gloo API and controller services:
Confirm the service is running:
Configure HTTP Basic Auth
Refer to the product documentation to learn about how Gloo Gateway enables HTTP basic auth using declarative configuration — and many other authorization strategies, too! — at the gateway layer.
In this exercise, we use the username test and password test123. The username and password have been hashed using the Apache htpasswd utility to produce the following:
- salt:
n28wuo5p - hashed password:
NLFTUNkXaht0g/2GJjUM51
On the control VM, we’ll create a corresponding AuthConfig resource. See the Gloo Gateway docs for a full list of supported request authorization strategies.
Use glooapi to apply this object to the control plane:
The gateway proxy will communicate with the ExtAuth service over a Unix Domain Socket. An Upstream resource is automatically created by Gloo Gateway when the default setting of ENABLE_GATEWAY_LOCAL_EXTAUTH=true is present in the /etc/gloo/gloo-controller.env file on the control plane VM. You can inspect this generated Upstream as shown below:
We’ll then add a new configuration object here, the RouteOption, to point at our HTTP basic auth config. We’ll then modify our routing behavior by updating our existing HTTPRoute to refer to that RouteOption:
Apply this new configuration on the control plane VM using glooapi:
On the data plane VM, confirm that a request without an Authorization header fails as expected:
Confirm a request with the base64 encoded user:password set in the Authorization header succeeds:
See the Gloo Gateway docs for more information on how to create declarative, API-driven authorization, along with a complete list of supported protocols.
Rate Limiting
In this section we’ll configure the Gloo rate limiting components on our gateway VM, then declare and test a global one-request-per-minute strategy on the gateway.
Install Gloo Gateway Rate Limiting Components
The Gloo Gateway rate limiting service is included in the gloo-extensions package. It can be installed on either the gateway or control VM, but since the gloo-extensions package is already installed on the gateway VM, we will use it there. As a general rule, you want the rate limiting service to be installed “near” the Envoy proxy gateway, which delegates to the rate-limit service as required to evaluate whether to accept a given request.
This example uses a simple one-per-minute global rate limiting config. You can be much more discriminating in your rate limiting than this, including rate limiting for particular users or classes of service, or even sets of request attributes. Learn more about the flexibility of Gloo rate limiting in the product documentation.
Rate limiting requires a persistence mechanism to track the counters of the various scenarios that are being rate-limited. Redis is the default choice for this storage, although other options are supported by Gloo as well.
In our case, we’ll deploy a simple free Redis instance. You can of course use a more robust enterprise Redis service, too.
Install the Redis service on the gateway VM. In our example, we follow this guide for a basic installation on our Ubuntu EC2 instance.
We will use redis123 as the password to access the keys on the server. Add the following to the bottom of the /etc/redis/redis.conf file:
Apply this config to the Redis config and restart the service:
Update /etc/gloo/gloo-ratelimiter.env by setting REDIS_PASSWORD=redis123.
Your gloo-ratelimiter.env should now look similar to this:
Note in particular that the REDIS_PASSWORD field matches our new global password.
Enable and start the gloo-ratelimiter service on the data plane VM:
An Upstream resource is automatically created by Gloo to access the rate-limit service when this default configuration is set ENABLE_GATEWAY_LOCAL_RATE_LIMITER=true. Confirm that this Upstream is already in place by using glooapi on the control plane VM:
Note that the rate limiter’s Upstream indicates an Accepted status.
Configure Rate Limiting
Apply a global rate limit config to limit requests to one per minute:
Apply this new rate limit specification on the control plane VM using glooapi:
Now we’ll add this to our gateway’s configuration by creating a new RouteOption object that points at our RateLimitConfig, and we’ll modify our existing HTTPRoute to reference it.
Apply the new RouteOption and the modified HTTPRoute using glooapi:
Confirm requests are being rate limited by issuing the same request to the gateway twice in succession. The first should be processed with no problem. The second should be rejected at the gateway layer with an HTTP 429 Too Many Requests error.
TLS Termination
Create certs on the control plane VM:
Modify the Gateway component to add an HTTPS listener on the proxy listening on port 8443.
Apply this new Gateway config on the control plane VM:
Back on the data plane VM, confirm that the HTTPS request succeeds:
Since the rate limiting configuration is still in place, you should also be able to re-issue the same request within a minute and see the expect HTTP 429 Too Many Requests error:
Cleanup VM Resources
Gateway / Data Plane VM
On Debian-based distros:
On RHEL-based distros:
Control Plane VM
On Debian-based distros:
On RHEL-based distros:
What About High Availability?
We’ve worked through a fairly simple example showing how to deploy an Envoy proxy, the Gloo Gateway control plane, and some related components on VMs with nary a Kube cluster in sight.
Many who are familiar with Kubernetes infrastructure for managing deployments with built-in high availability might be asking: Is HA is possible in a no-Kube scenario like this?
The answer is yes, with some explanation required. Gloo Gateway does not aspire to duplicate Kube infrastructure, so static provisioning of components on VM infrastructure is a management task that the Gloo user would take on.
But in terms of HA of the Gloo infrastructure, Solo provides some important capabilities. For example, we earlier discussed storage of configuration artifacts at runtime. This is managed in Kube deployments using the standard etcd storage framework. Alas, there is no standard object framework on VMs. Gloo addresses this by supporting file-based storage for simple deployments like ours. But it also supports shared storage platforms like Postgres for environments where HA is a priority.
Recap and Next Steps
If you’ve followed along to this point, congratulations! We’ve deployed the entire Gloo Gateway infrastructure in a No-Kube, VM-only environment. We’ve established TLS termination for all services in our gateway layer. Plus, we’ve configured basic traffic routing and some advanced features like external authorization and rate limiting. And we did this all with a Kubernetes-standard, declarative API.
Gloo Gateway equips its users with a unified control plane and delivers many operational benefits across both Kubernetes and non-Kube platforms:
- Simplified Management: Benefit from a single interface for managing both API gateway and service mesh components, reducing the burden of overseeing multiple systems.
- Consistent Policies: Enforce consistent security, traffic management, observability, and compliance policies across Kube and non-Kube infrastructure, ensuring uniform adherence to best practices.
- Streamlined Operations: Isolate and resolve operational issues quickly by leveraging the centralized monitoring, logging, and troubleshooting capabilities provided by the unified control plane.
- Enhanced Observability: Enjoy heightened visibility into traffic patterns, performance metrics, and error rates across different types of infrastructure.
To experience the Gloo Gateway magic across multiple platforms for yourself, request a live demo here or a trial of the enterprise product here.
If you’d like to explore the more conventional Kube-only deployment approach with the Gateway API, check out this tutorial blog.
Would you like to learn more about the alternative model we mentioned earlier, with the Envoy-based data plane on a VM but the Gloo control plane hidden away in a Kube cluster? If so, check out the second part of this blog series here.
Explore all the configuration used in this exercise is available in GitHub here.
If you have questions or would like to stay closer to Solo’s streams of innovation, subscribe to our YouTube channel or join our Slack community.
Acknowledgements
One of the great things about working with Solo is that there are lot of people smarter than I am to provide advice and reviews. Many thanks to Shashank Ram for doing much of the core engineering work and supporting me throughout this process. And also thank you to Ram Vennam and Christian Posta for their insights that greatly enhanced this blog.









%20a%20Bad%20Idea.png)


%20For%20More%20Dependable%20Humans.png)


